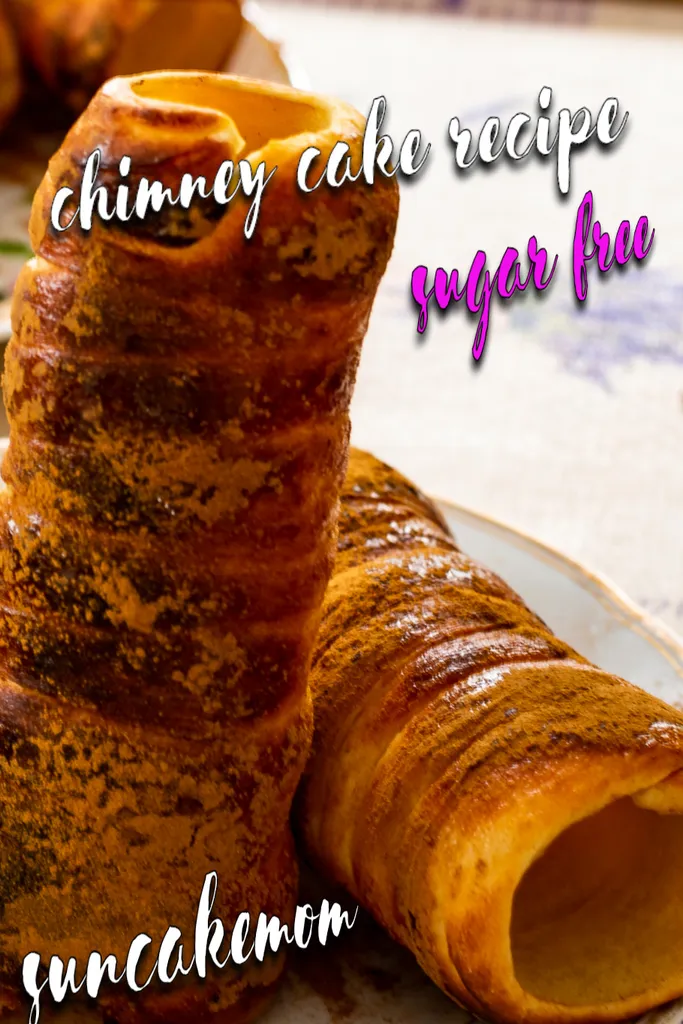
Looking to revive long forgotten memories or just longing for new ones? Let’s try this chimney cake that turns every memory a good one!
Most of us know the feeling when a highly anticipated piece of art doesn’t come out of the oven as it was expected. The disappointment, the powerlessness over the situation can overwhelm our feelings and we could beat the butter out of that miserable thing with the rolling pin (if it wasn’t made of marble, of course).
Instead, we just burst into tears and scrape the remnants off the floor and find somebody to vent our anger out quickly. If we had a chimney cake right there and then (or an eat everything up solution like a hubby, kids, dogs…) we could air our frustration out easily.
What are chimney cakes?
Chimney cakes aren’t one of those things that come around easily, unfortunately. These are rather the ones that induce tears and require commitment to make. Given that we haven’t ordered a chimney cake making kit from AliExpress for a trifling $700.
It’s totally worth the price if we plan to make chimney cakes 24/7 and sell them for a lovely profit but only to provide a little excitement on one of the boring BBQ parties, it’s hardly a price to pay.
Unfortunately, it seems that China hasn’t yet caught up with the chimney cake frenzy the world is feverish about, and it’s pretty hard to get chimney cake pins delivered to our front doors.
We can, of course, pick up a couple of these tools for an outrageously small amount of money if we are willing to travel where chimney cakes are originated from.
For those who aren’t willing to discover the real dwelling of Dracula, ride 5 horses at once or indulge in cheap beer while hunting for chimney cake pins, there are ways to make chimney cakes too though.
How to make chimney cake at home?
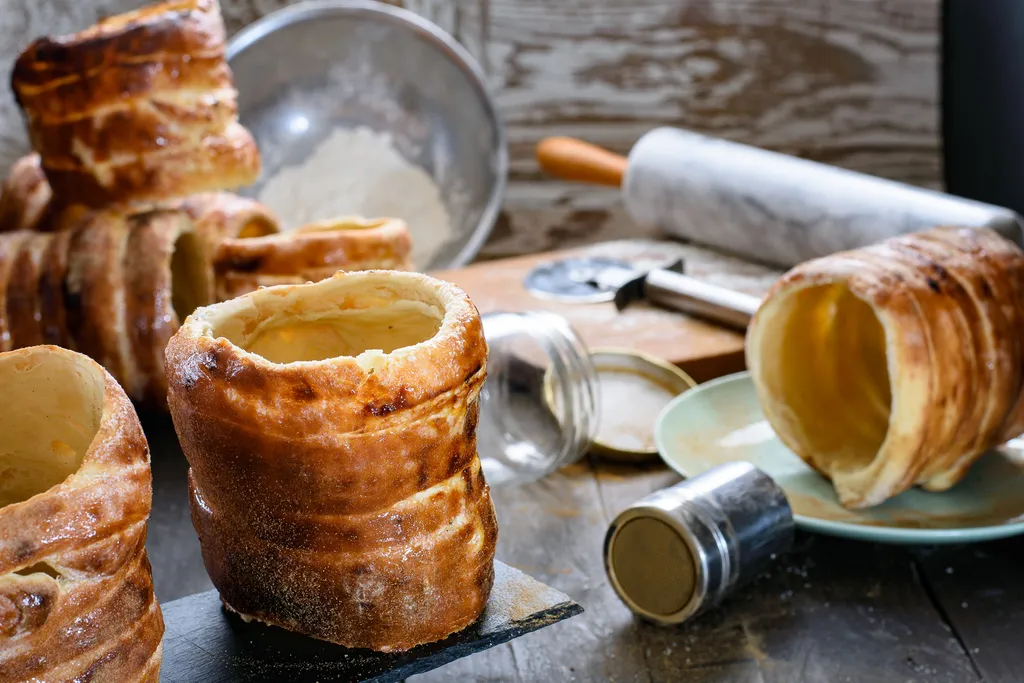
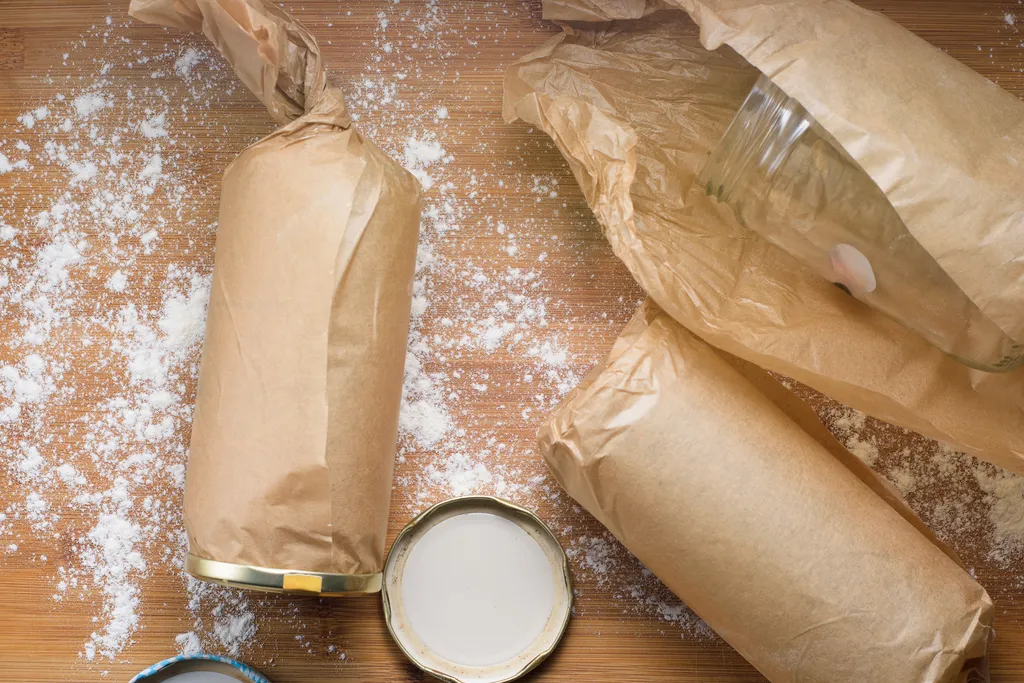
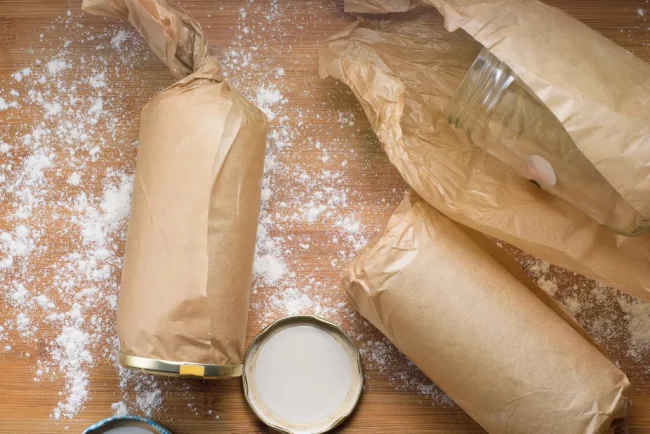
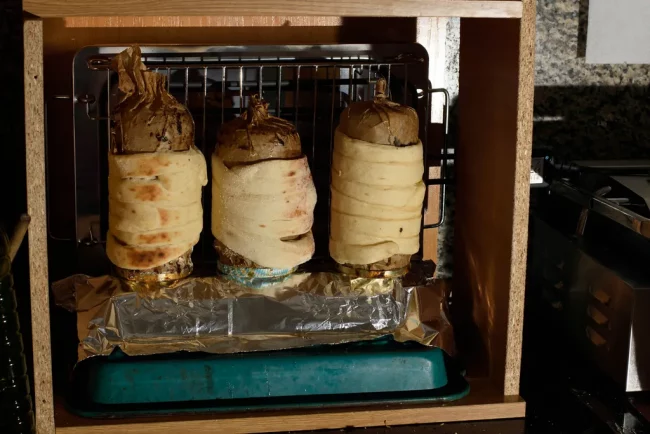
A long tin can (25FL ones) would do the job just fine or long glass jars would also serve well. Covering them both with parchment paper will allow fairly easy removal of the done chimney cakes without the need of waiting for an extensive cool down period.
Chimney cakes are traditionally covered with crushed walnut and sugar that caramelized by the the scorching heat of some sort of open fire but as we’ll soon see sugar can be substituted and we can use our trusty oven to prepare chimney cakes. Well, sort of…
Ingredients
Dough
- 1 ½ cup / 260g Milk
- 1 tablespoon / 10g Fresh yeast
- 5 cups / 600g Flour
- 5 tablespoons / 60g Butter (unsalted, room temperature)
- 1 medium / 50g Egg
- 1 tablespoon / 15g Vanilla extract
- ½ teaspoon /3g Salt
- 2 tablespoons / 40g Honey or sweetener of choice (traditionally sugar) (optional)
Cover
- ½ cup / 100g Sugar or sweetener of choice
- 1 tablespoon / 8g Cinnamon
- Optional
- Walnut (crushed)
- Cinnamon (ground)
- Coconut (flakes)
- Almond (crushed or flakes)
How to make Chimney cake
Chimney cake sticks -Traditonal
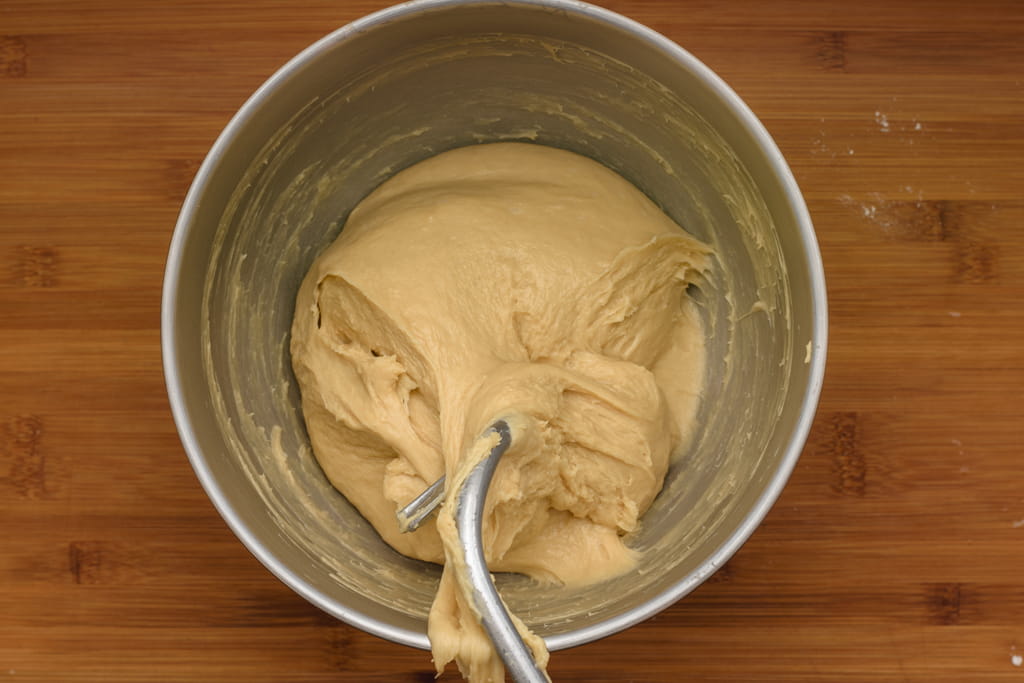
- Dissolve fresh yeast in lukewarm milk. Add flour, butter, egg, vanilla extract, salt and the optional sweetener of choice. Knead everything together until it’s uniform and the dough is off the side of the mixing bowl.

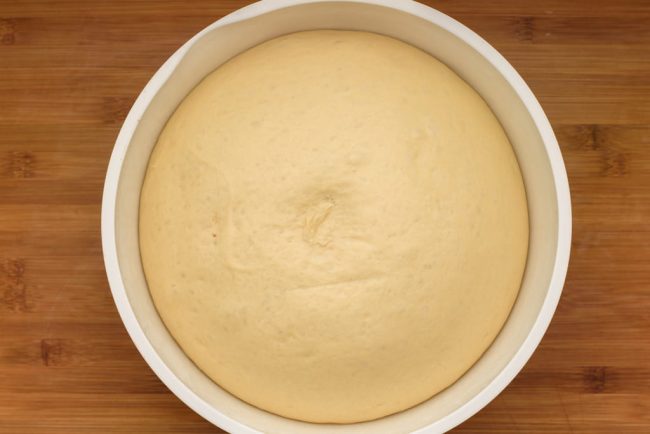
- Cover the bowl and leave it in a warm place for an hour to raise. While we are waiting for the dough to double, get the chimney cake sticks ready by spreading some oil or melted butter on them. This is supposed to prevent the dough to stick. After an hour, take the dough out of the bowl onto a floured surface.
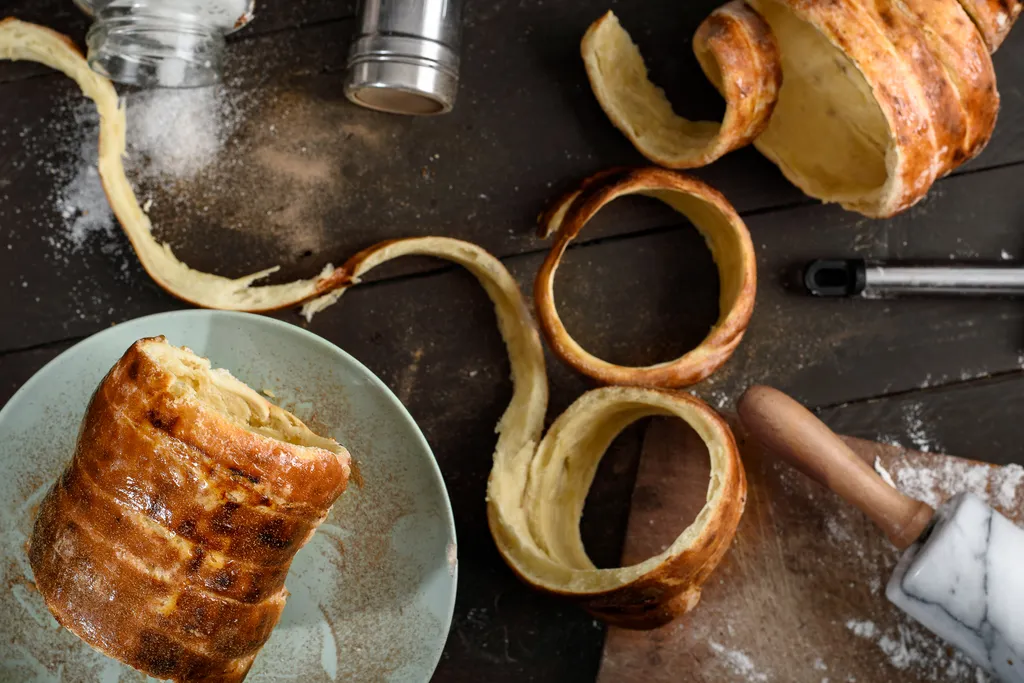
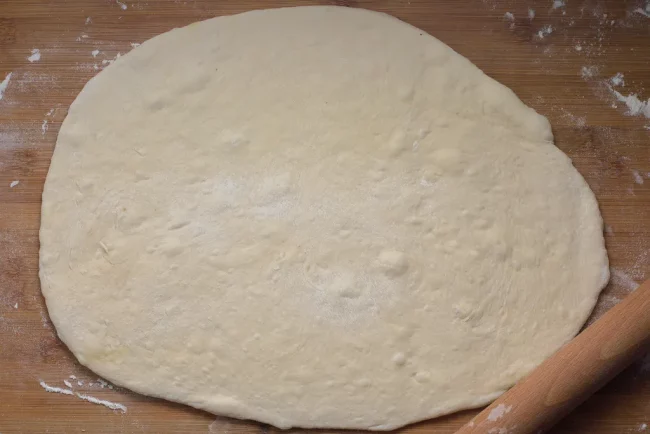
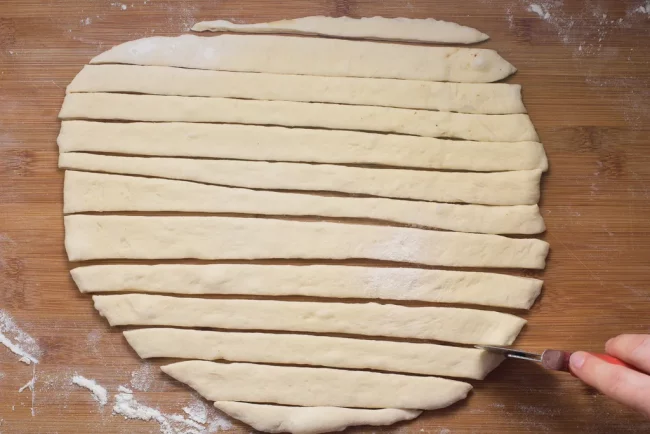
- Roll the dough out to about 1/2″ / 1.5cm height. Cut the rolled out dough up into ½” / 1.5cm stripes.
- Start rolling up the stripes onto the sticks.
- Rolling up the dough stripes needs a bit of practice. If we happen to mix together a softer dough, handling it will be a bit challenging which result less than optimal spirals.
- Roll it gently on a lightly floured surface to even the surface up.
- Brush them lightly with oil then roll them in sugar.
- Place them onto the top shelf of the oven, right under the preheated a 450°F / 230°C broiler. Turn the dough every 30 – 60 second or so depending how quickly the sugar melts and caramelizes.
- Once all the sides are caramelized and the dough is baked take the the chimney cake out. It should take about 15 – 20 minutes.


Assembly
- While the cakes are in the oven, prepare a tray with the desired covering.
- When the cakes are ready take them out then immediately roll them into the prepared covering.
Enjoy!
— — —
Chimney cake – Freestyle
- Mix yeast and milk then knead flour, butter, vanilla extract, salt and the eggs.
- Cover the bowl and leave it in a warm place for an hour to raise.
- After an hour, take the dough out of the bowl onto a floured surface then roll it out to about 1/2″ / 1cm height.
- Cut the rolled out dough up into ½” / 1.5cm stripes.


Chimney cake rolling – Beer can method
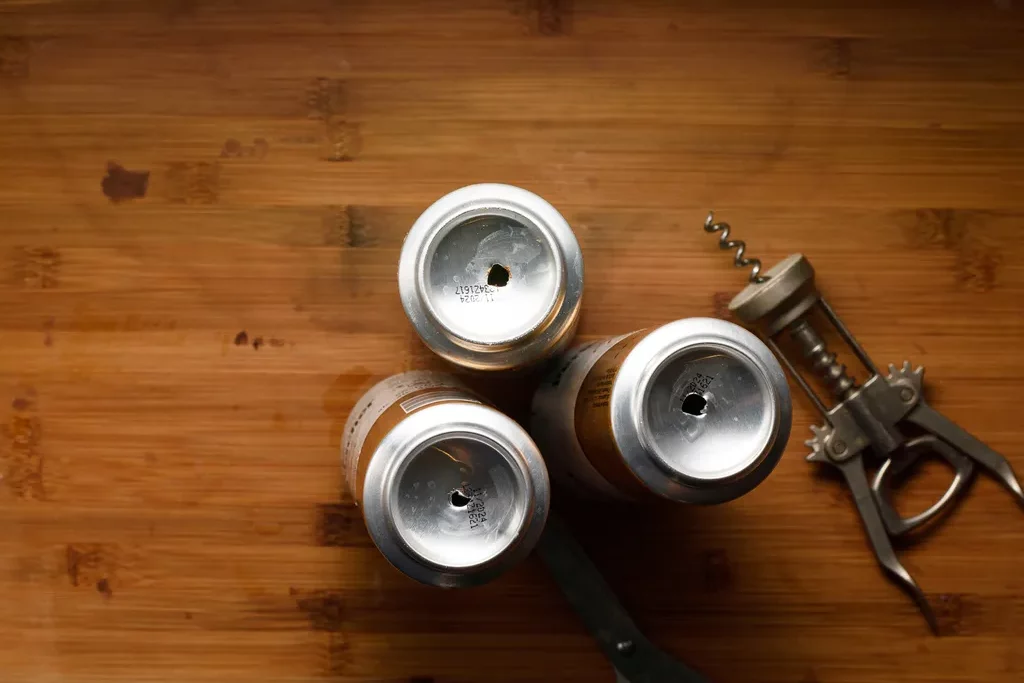
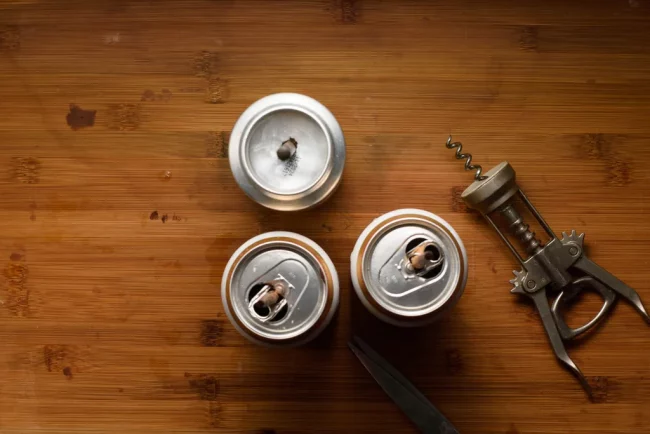
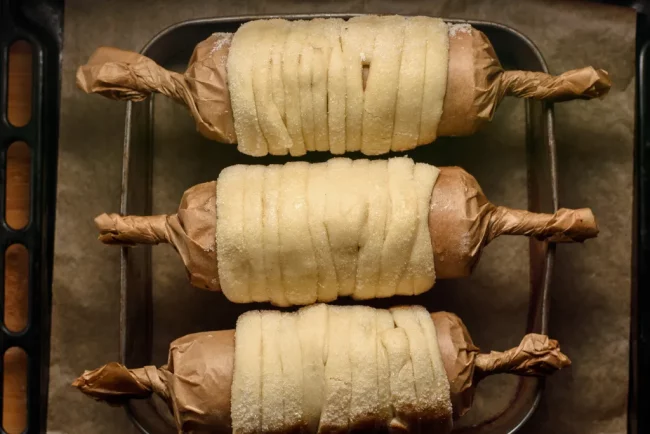
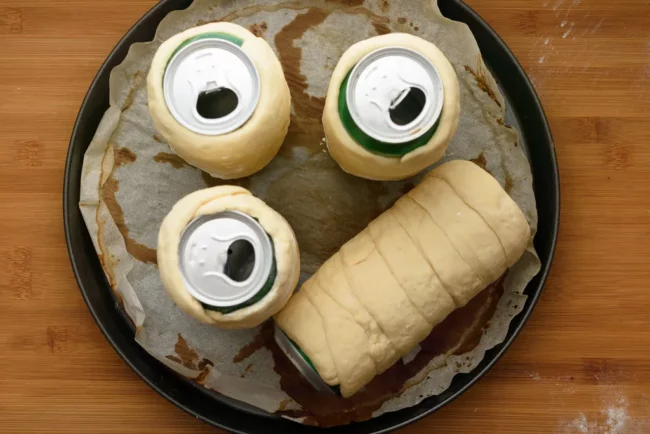
- While we are waiting for the dough to double in size, get the chimney cake rolls ready. Empty the tin cans and poke a hole at the bottom possibly in the middle. Keep the can opener bits!
- Stick something long and not melting, such as a chopstick, through the bottom and the hole of the can opener bit.
- Cover them with parchment paper so it will be easier to remove the baked chimney cakes. Applying a double layer will give the paper more strength.
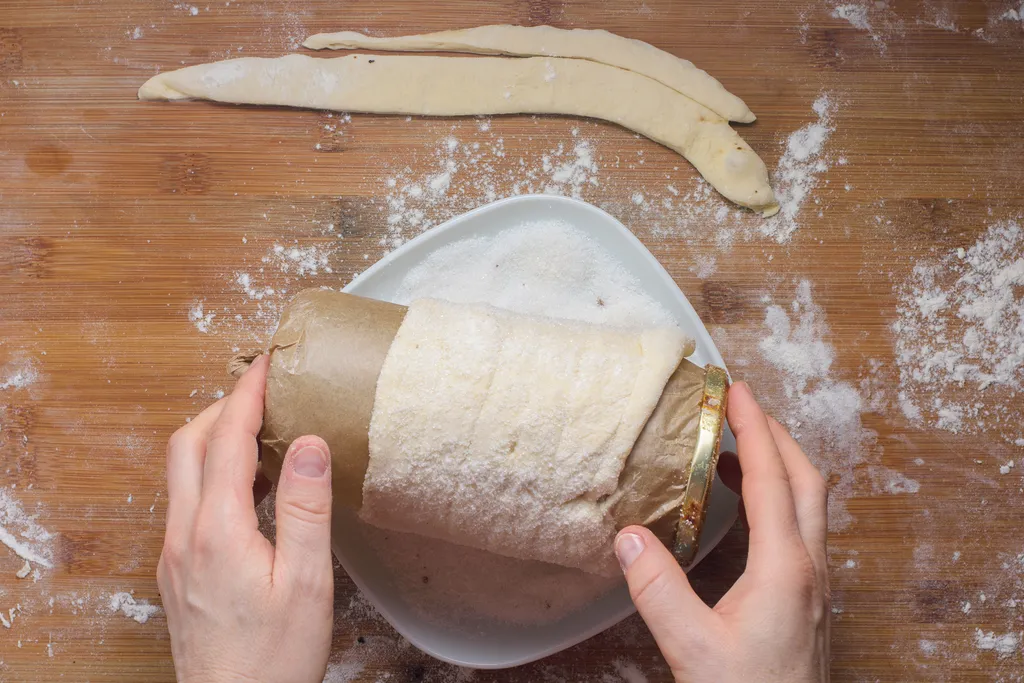
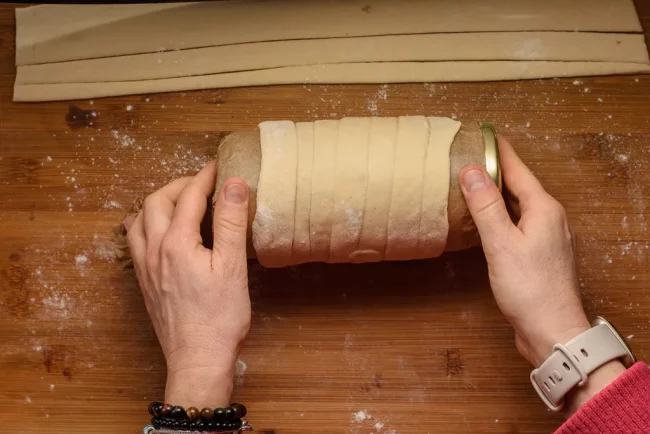
- Roll the dough up. Apply a tin coat of water at the end of each piece so the next will will stick to it easier.
- Close the end by the same method pressing it to the above layer.
- To even the surface and connect the stripes, roll the can gently on a lightly floured surface.
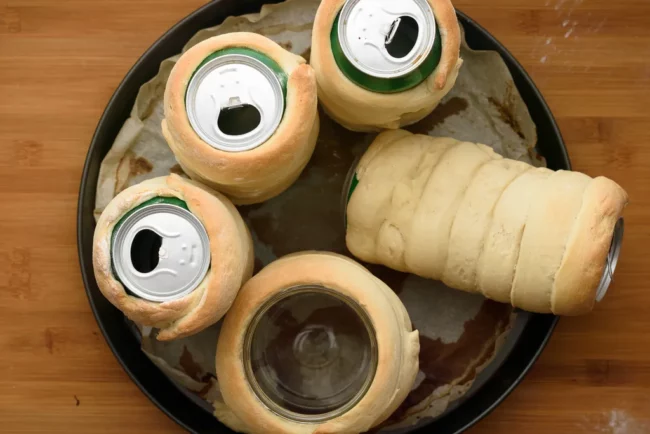
- Apply a thin coat of oil or just simple water so the sugar will stick to the dough better.
- Traditionally chimney cakes are rolled into sugar that should caramelize during the baking process.
- Use a spring form as a frame to keep the chimney cakes touching a baking sheet.
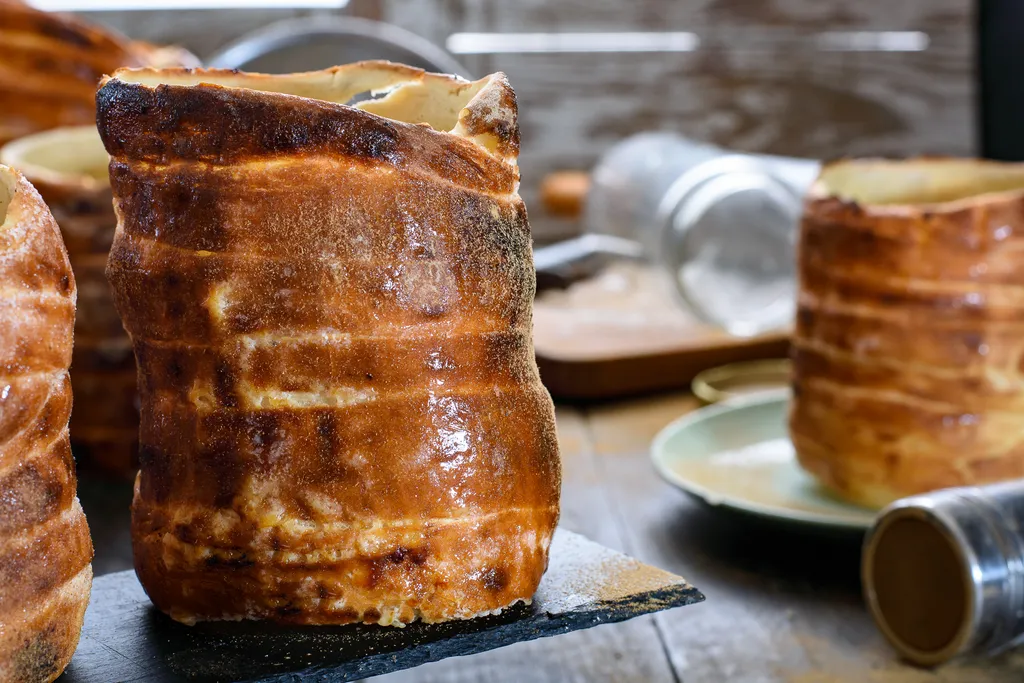
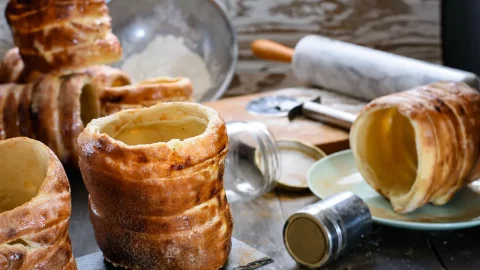
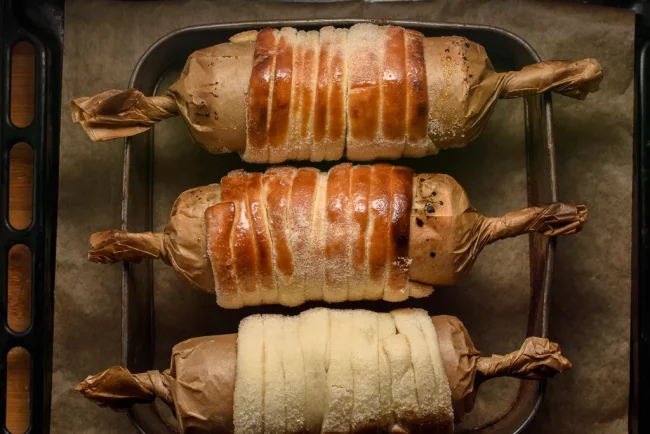
- Place the sugar coated chimney cakes under the 450°F / 230°C broiler until the sugar starts to melt then caramelizes about 30 – 180 seconds. Depending on the oven rack height and broiler starting temperature. Mind that we only use the broiler part of the oven here and the oven door can be left open. Since this method replicates best the traditional chimney cake making process we almost constantly need to move the chimney cakes so the sugar caramelizes but it doesn’t burn.
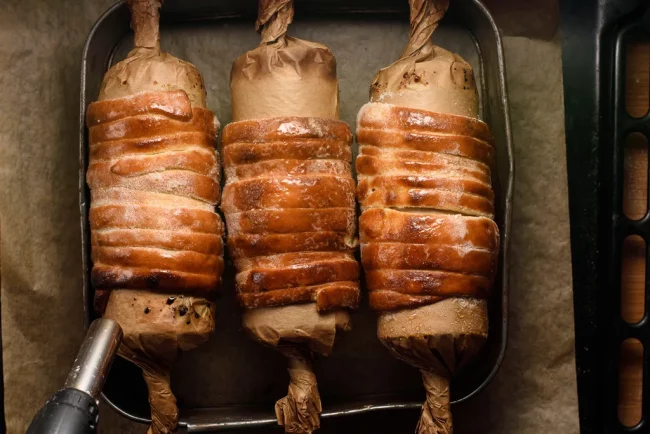
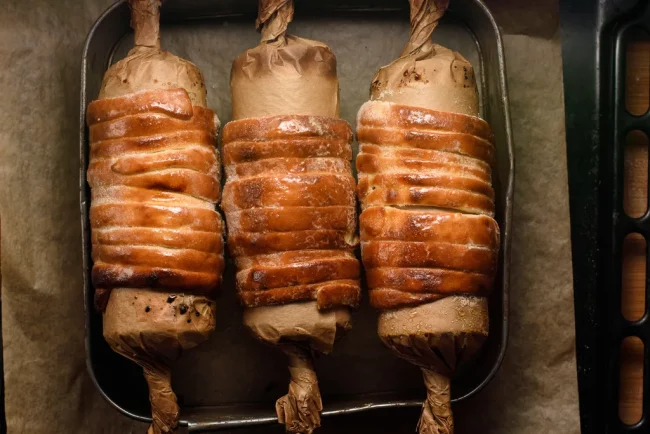
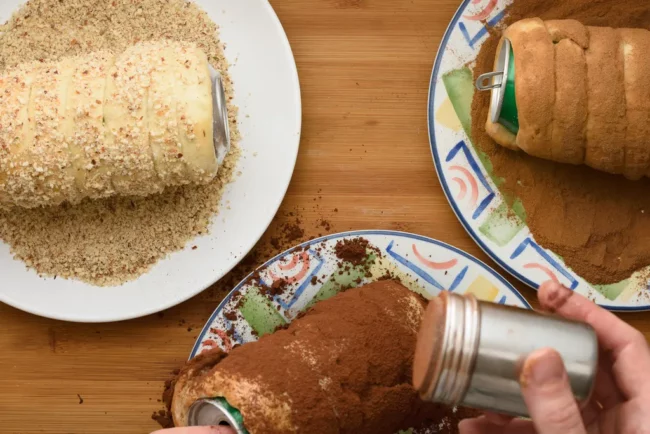
- Take them out and roll them around so the sugar caramelizes on all sides. It takes some practice, fiddling with the imperfect chimney rolls and time to get all the sides done. It takes about 10 minutes to get all the sides done
- Some sugar will not caramelize but if we have a blowtorch we can quickly help on that. We can also leave it like that.
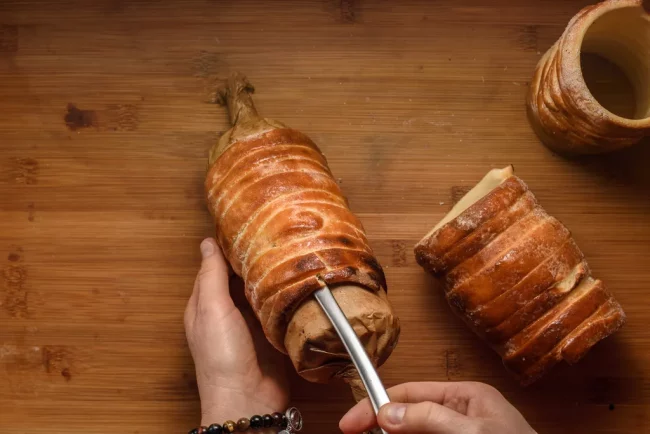
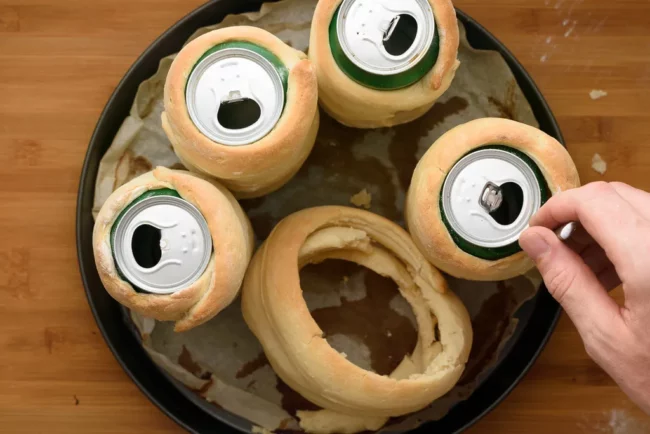
- Use a knife to loosen up the dough. It’s hot so be careful.
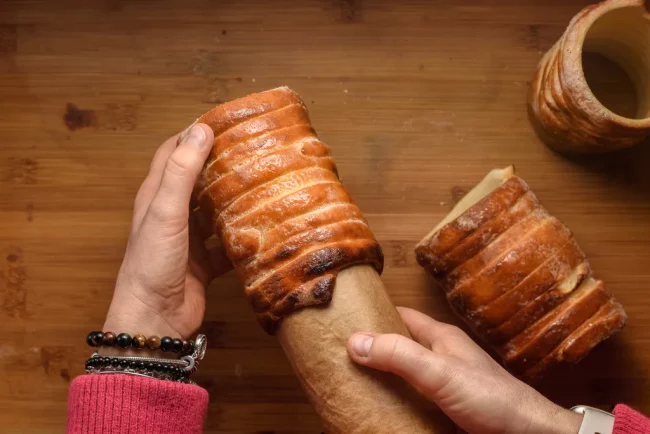
- Slide it off the can.
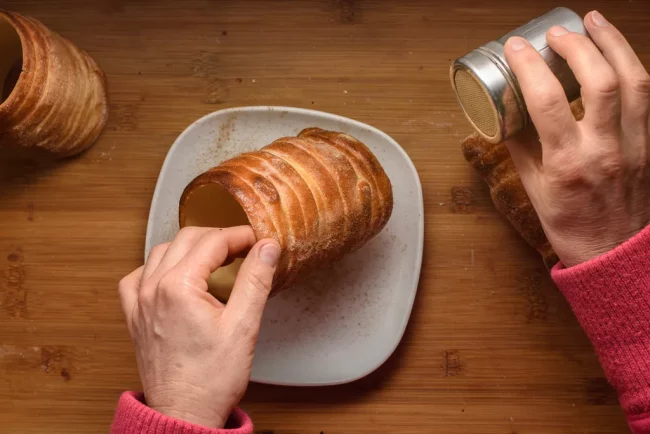
- Coat it with freshly ground cinnamon, cocoa powder or ground nuts of choice.


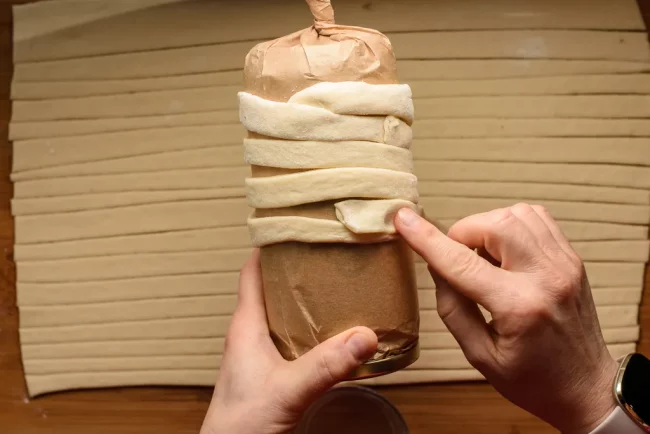
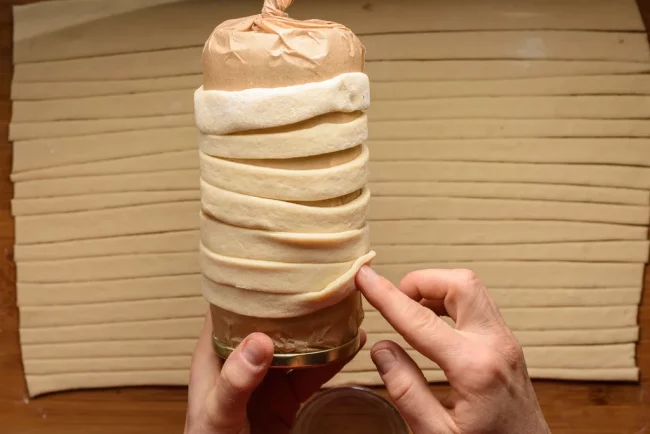
Chimney cake rolling – Jars method
- Cover jars with parchment paper so it will be easier to remove the baked chimney cakes. Using jars will allow us to stick one end of the parchment paper inside and lock it with the lid.
- Roll the dough up. Apply a tin coat of water at the end of each piece so the next will will stick to it easier.
- Close the end by the same method pressing it to the above layer.
- To even the surface and connect the stripes, roll the can gently on a lightly floured surface.
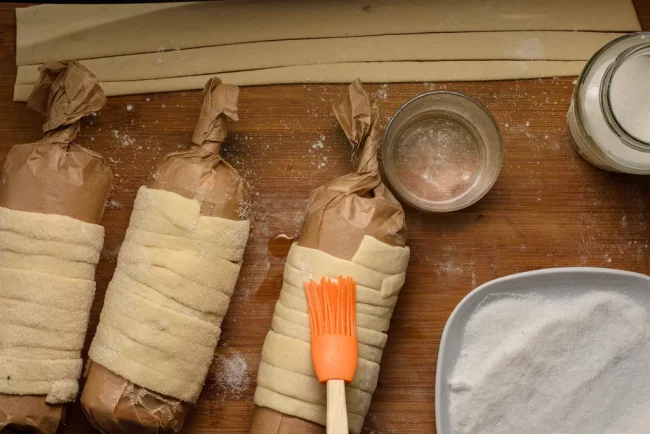
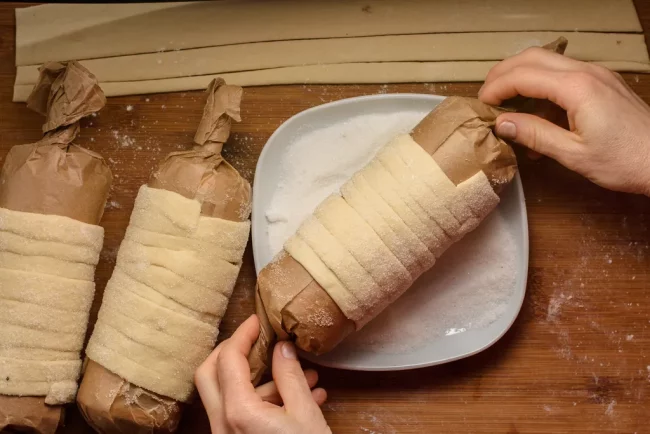
- Apply a thin coat of oil or just simple water so the sugar will stick to the dough better.
- Traditionally chimney cakes are rolled into sugar that should caramelize during the baking process.
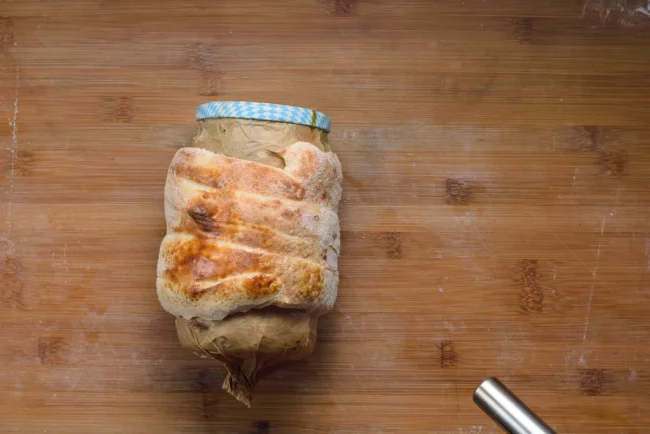
- Place the sugar coated chimney cakes into a 400°F / 200°C preheated oven for about 10 – 15 minutes. Unfortunately, the vertical baking process is less than ideal caramelizing the sugar on the surface of the dough so we need some heavy postprocessing with a blowtorch.
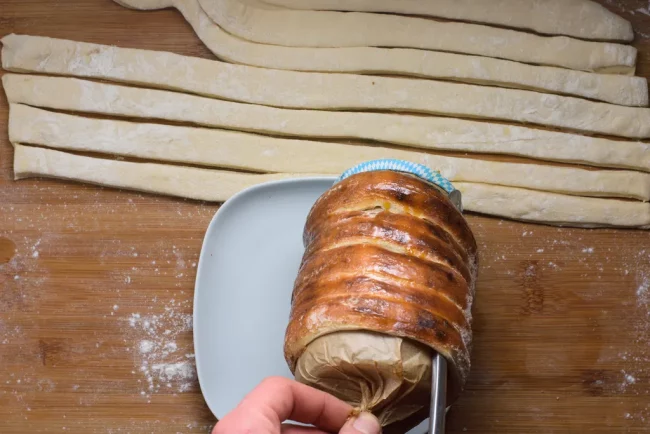
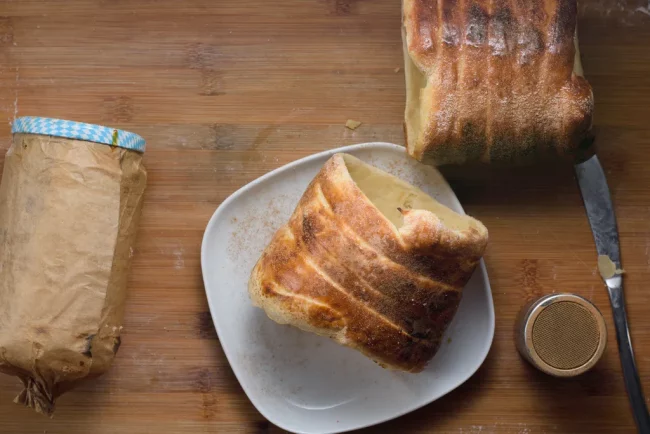
- Use a knife to loosen up the dough then slide it off the jar.
- Coat it with freshly ground cinnamon, cocoa powder or ground nuts of choice.


Alternative sweetener – Honey
- Using honey as an alternative sweetener is also an option but apart of honey is not capable creating a caramelized crunchy exterior brushing the dough with honey or any liquid sweetener before baking is not really recommended as it will drip off in the oven.
- Place the dough into a 400°F / 200°C oven for about 10 – 15 minutes.
- Brush them with honey or any liquid sweetener of choice.
- Apply the covering either by simply sprinkling on the cake or roll them in the prepared covering.
- Take the chimney cake off. We can use a simple knife to separate the cake from the can if necessary.


Alternative method- Use at own risk
- Flip an electric barbecue grill up vertically on its side then place the vertically standing chimney cakes in front of it. This method makes it easier to constantly rotate the chimney cakes.
- Although far from safe and with real chances of burning something down, creates much better looking results with honey too.


Enjoy!
Note: Air and flour humidity can greatly influence the outcome of the dough. Grannystyle chimney cake was made at over 60% humidity while the Freestyle chimney cake at about 20%.
Chimney cakes are a real treat but so are these cuties:
- Easy Cinnamon Roll Recipe
- Sweet Rolls with Chocolate
- Braided Bread Recipe with Chocolate Filling
- Sugar Free Chocolate Swirl Bread with Raisins
Chimney Cake Recipe
Ingredients
Dough
- 1 ½ cup Milk
- 1 tablespoon Fresh yeast
- 5 cups Flour
- 5 tablespoon Butter unsalted, room temperature
- 1 medium Egg
- 1 tablespoon Vanilla extract
- ½ teaspoon Salt
- 2 tablespoons Honey or sweetener of choice traditionally sugar
Cover
- ½ cup Sugar or sweetener of choice
- Optional
- Walnut crushed
- Cinnamon ground
- Coconut flakes
- Almond crushed or flakes
Instructions
Chimney cake – Freestyle
- Mix yeast and milk then knead flour, butter, vanilla extract, salt and the eggs.

- Cover the bowl and leave it in a warm place for an hour to raise.
- After an hour, take the dough out of the bowl onto a floured surface then roll it out to about 1/2″ / 1cm height.
- Cut the rolled out dough up into ½” / 1.5cm stripes.

Chimney cake rolling – Beer can method
- While we are waiting for the dough to double in size, get the chimney cake rolls ready. Empty the tin cans and poke a hole at the bottom possibly in the middle. Keep the can opener bits!
- Stick something long and not melting, such as a chopstick, through the bottom and the hole of the can opener bit.
- Cover them with parchment paper so it will be easier to remove the baked chimney cakes. Applying a double layer will give the paper more strength.
- Roll the dough up. Apply a tin coat of water at the end of each piece so the next will will stick to it easier.
- Close the end by the same method pressing it to the above layer.
- To even the surface and connect the stripes, roll the can gently on a lightly floured surface.
- Apply a thin coat of oil or just simple water so the sugar will stick to the dough better.
- Traditionally chimney cakes are rolled into sugar that should caramelize during the baking process.
- Use a spring form as a frame to keep the chimney cakes touching a baking sheet.
- Place the sugar coated chimney cakes under the 450°F / 230°C broiler until the sugar starts to melt then caramelizes about 30 – 180 seconds. Depending on the oven rack height and broiler starting temperature. Mind that we only use the broiler part of the oven here and the oven door can be left open. Since this method replicates best the traditional chimney cake making process we almost constantly need to move the chimney cakes so the sugar caramelizes but it doesn’t burn.
- Take them out and roll them around so the sugar caramelizes on all sides. It takes some practice, fiddling with the imperfect chimney rolls and time to get all the sides done. It takes about 10 minutes to get all the sides done
- Some sugar will not caramelize but if we have a blowtorch we can quickly help on that. We can also leave it like that.
- Use a knife to loosen up the dough. It’s hot so be careful.
- Slide it off the can.
- Coat it with freshly ground cinnamon, cocoa powder or ground nuts of choice.


Chimney cake rolling – Jars method
- Cover jars with parchment paper so it will be easier to remove the baked chimney cakes. Using jars will allow us to stick one end of the parchment paper inside and lock it with the lid.
- Roll the dough up. Apply a tin coat of water at the end of each piece so the next will will stick to it easier.
- Close the end by the same method pressing it to the above layer.
- To even the surface and connect the stripes, roll the can gently on a lightly floured surface.
- Apply a thin coat of oil or just simple water so the sugar will stick to the dough better.
- Traditionally chimney cakes are rolled into sugar that should caramelize during the baking process.
- Place the sugar coated chimney cakes into a 400°F / 200°C preheated oven for about 10 – 15 minutes. Unfortunately, the vertical baking process is less than ideal caramelizing the sugar on the surface of the dough so we need some heavy postprocessing with a blowtorch.
- Use a knife to loosen up the dough then slide it off the jar.
- Coat it with freshly ground cinnamon, cocoa powder or ground nuts of choice.

Alternative sweetener – Honey
- Using honey as an alternative sweetener is also an option but apart of honey is not capable creating a caramelized crunchy exterior brushing the dough with honey or any liquid sweetener before baking is not really recommended as it will drip off in the oven.
- Place the dough into a 400°F / 200°C oven for about 10 – 15 minutes.
- Brush them with honey or any liquid sweetener of choice.
- Apply the covering either by simply sprinkling on the cake or roll them in the prepared covering.
- Take the chimney cake off. We can use a simple knife to separate the cake from the can if necessary.

Alternative method- Use at own risk
- Flip an electric barbecue grill up vertically on its side then place the vertically standing chimney cakes in front of it.
- Although far from safe and with real chances of burning something down, creates much better looking results with honey too.

Notes
Nutrition
Pin now, Enjoy later!
Heavenly. Thanks for the recipe, now I can make my own and don’t need to fly to Hungary.
It states to add the honey with the flour butter eggs vanilla but in the recipe it doesn’t show honey or any sweetener that goes into the dough. Or am I missing something. ?
Thanks for pointing that out! It’s been corrected. If you like a sweeter dough you can add sugar, honey or sweetener of choice to the dough but it’s not necessary at all since the cakes will be rolled in sweet coating anyway.
Always happy to help! ;D
I’m a little concerned, my dough came out very sticky to the point I cannot manage so I keep adding flour. What do you think I did wrong?
You didn’t do anything wrong. Due to the enriched nature of the dough, it is very soft and requires some patience and lot of love to manage. Depending on the flour’s initial moisture content we could end up something that dances on our nerves more than we like. Adding the milk incrementally allows us gauge the state of the dough and use less liquid if deemed necessary.
Coating the hands and the working surface with flour or even better with cooking oil will prevent the dough sticking to them.
Adding more flour to the soft dough works bringing down the flour – liquid ratio and it may help a bit managing the dough better but the dough’s softness is caused by the added fat (butter, egg yolk).
Nice one